
Real estate photography tips that sell listings faster
Real estate photography tips matter because buyers form impressions of listings very quickly online, and photo quality is one of the strongest factors driving whether they click through or scroll past. According to the National Association of Realtors, roughly 95% of buyers now begin their property search online. That means your listing photos aren't just supporting material, they are the listing. Poor photography is one of the most common factors limiting online engagement, even when the property itself is genuinely compelling.
The premium listing market has quietly raised the bar for everyone. Buyers scrolling through portals have seen editorial-quality imagery on high-end properties, and that standard shapes their expectations even when they're looking at mid-range homes. A story-driven, mood-conscious approach to property photography is increasingly relevant beyond luxury listings. Agents who want their properties to perform are adopting it too.
This guide covers every stage of a sale-focused shoot: how to prepare the home, which shots to prioritize, what gear and settings to use, how to handle light at any time of day, and how to edit consistently without over-processing. Follow these real estate photography tips and your listing photos will work harder from the moment they go live.
Real estate photography tips: stage the home before the camera arrives
Staging and preparation are among the most controllable variables in listing photography, and basic prep costs nothing but time. Agents who treat pre-shoot prep as optional typically get weaker images than those who treat it as non-negotiable, even working with the same photographer, in the same home, at the same price point.
Clear like a stylist, not a homeowner
The mindset shift required here is significant. Remove 30, 50% more than feels comfortable. Personal items, small appliances, pet gear, and decorative clutter all compress visual space in photos, making rooms read smaller and less composed than they actually are. The goal is a clean, neutral canvas that lets the room's architecture speak clearly. Over-staging is rare in residential photography. Under-clearing is the near-universal problem.
The room-by-room prep checklist
Work through the home systematically before the photographer arrives. Break it down by area:
- Kitchen: Counters completely clear, sink empty, fridge bare of magnets and papers, floor mats removed.
- Living areas: Furniture pulled slightly from walls to create breathing room, surfaces minimal, TVs off, personal photos down.
- Bathrooms: Lids down, all toiletries hidden, towels folded and matched, plungers and cleaning brushes out of frame.
- Bedrooms: Beds made with clean neutral linens, nightstands stripped to one item maximum.
- Exterior: Cars out of the driveway, bins hidden, lawn trimmed, patio furniture arranged.
Turn the lights on and open the blinds
Every interior light in the home should be on before the photographer walks through the door. Replace any burnt-out globes with warm LED bulbs, turn ceiling fans off, and open all window coverings to the same level throughout each room. This preparation step directly affects how the photographer handles exposure and bracketing. A well-lit room with open blinds gives them more tonal range to work with and reduces the complexity of blending in post. For practical, room-specific advice on capturing interiors, many photographers refer to established tips for photographing real estate interiors.
Real estate photography tips for lighting and timing
Lighting decisions happen before the shutter opens. Choosing the right time of day and understanding how natural light behaves inside a home determines whether you're fighting the camera or working with it. The photographers who consistently produce standout listing images aren't just technically skilled. They're disciplined about when they shoot and how they manage the relationship between interior and exterior light.
The best times of day for exterior shots
Golden hour, approximately one hour after sunrise and one hour before sunset, produces soft, directional light that adds depth and warmth to facades without harsh shadows. Midday sun creates flat imagery where architectural details wash out and shadows cut across the front of the home at unflattering angles. The optimal window shifts by season and by property orientation: east-facing homes shoot best in the morning, west-facing homes in the late afternoon. Schedule accordingly, because lighting is the hardest variable to fully correct in post.
Balancing interior light with window views
The core challenge in interior real estate photography is exposure. Meter for the interior and the windows blow out white. Meter for the windows and the room goes dark. HDR bracketing solves this by capturing 3, 5 exposures at 2 EV intervals, giving you the full tonal range of the scene to work with in post. The professional standard is the flambient technique: combining a flash-lit ambient frame (which fills interior shadows evenly) with a window-exposed frame (which preserves the exterior view), then blending the two layers in Photoshop using layer masks. The result looks natural because it mirrors the way the human eye actually perceives a well-lit room.
Why twilight exteriors are worth the extra session
A twilight exterior captures something a daytime shot simply cannot: warm interior light glowing through windows, architectural lighting activated, and a soft blue sky that frames the home with cinematic depth. Twilight photos consistently outperform daytime-only exteriors for engagement on listing portals and social media. Some photographers have reported significantly higher click-through rates on thumbnail views compared to standard daytime shots. For premium properties, this shot isn't optional, it's the hero image that stops the scroll. Even on mid-range listings with good exterior lighting or outdoor entertaining areas, a twilight frame earns its place in the final gallery.
Gear and settings that move the needle
You don't need a six-figure kit to shoot compelling listing photos, but you do need the right combination of camera body, lens, and settings to consistently capture rooms at their best. The gear decisions that actually matter come down to sensor size, focal length, and how you handle dynamic range without blowing the shoot schedule.
The camera and lens combination that covers most listings
A full-frame mirrorless body, the Sony A7 III is a reliable workhorse in this category, paired with a wide-angle zoom in the 16, 35mm f/2.8 range covers the vast majority of listing shoot scenarios. Full-frame sensors handle the dynamic range of interior-to-window scenes significantly better than crop sensors, which matters most in bright or high-contrast rooms. For portable lighting, a Godox V1 speedlight handles bounce fill in most interiors without the bulk of a full strobe kit, if you need to expand beyond a single head, consult a curated lighting kit guide to find affordable, reliable options. A small bi-color LED panel adds flexibility for video walkthroughs or darker spaces with limited natural light.
Camera settings and HDR bracketing basics
Set ISO to 400 and aperture to f/8 or f/11 for full depth of field throughout the room. Use spot metering aimed at a mid-tone area, not the window and not the darkest corner. Enable AEB mode, set the exposure increment to ±2 EV, and switch to continuous shooting so all bracketed frames capture in a single shutter press. Mount on a tripod; this is non-negotiable for HDR work because frames must align perfectly for blending in post. Movement between exposures creates ghosting that's visible in the final image and costs time to fix.
Your room-by-room shot list, prioritized
A clear shot list keeps you focused on set and prevents missed angles in the edit. For a standard 2, 4 bedroom home, aim for 30, 50 images that tell a complete, flow-forward story of the property from street to backyard. The priority structure below reflects where buyers spend the most time looking, and where gaps in coverage cost listings the most.
Exterior and entry: first impressions in 6, 8 frames
Capture the front facade from straight-on and two angled positions, plus a close-up of the entry, walkway, or front door. The rear yard needs two angles showing the home's backside and the yard's full extent, plus a dedicated shot of any patio or outdoor entertaining area. Entry and foyer get two shots: one wide, one showing the flow through to the main living area. These frames set the context for everything that follows, so they earn extra care with composition and timing.
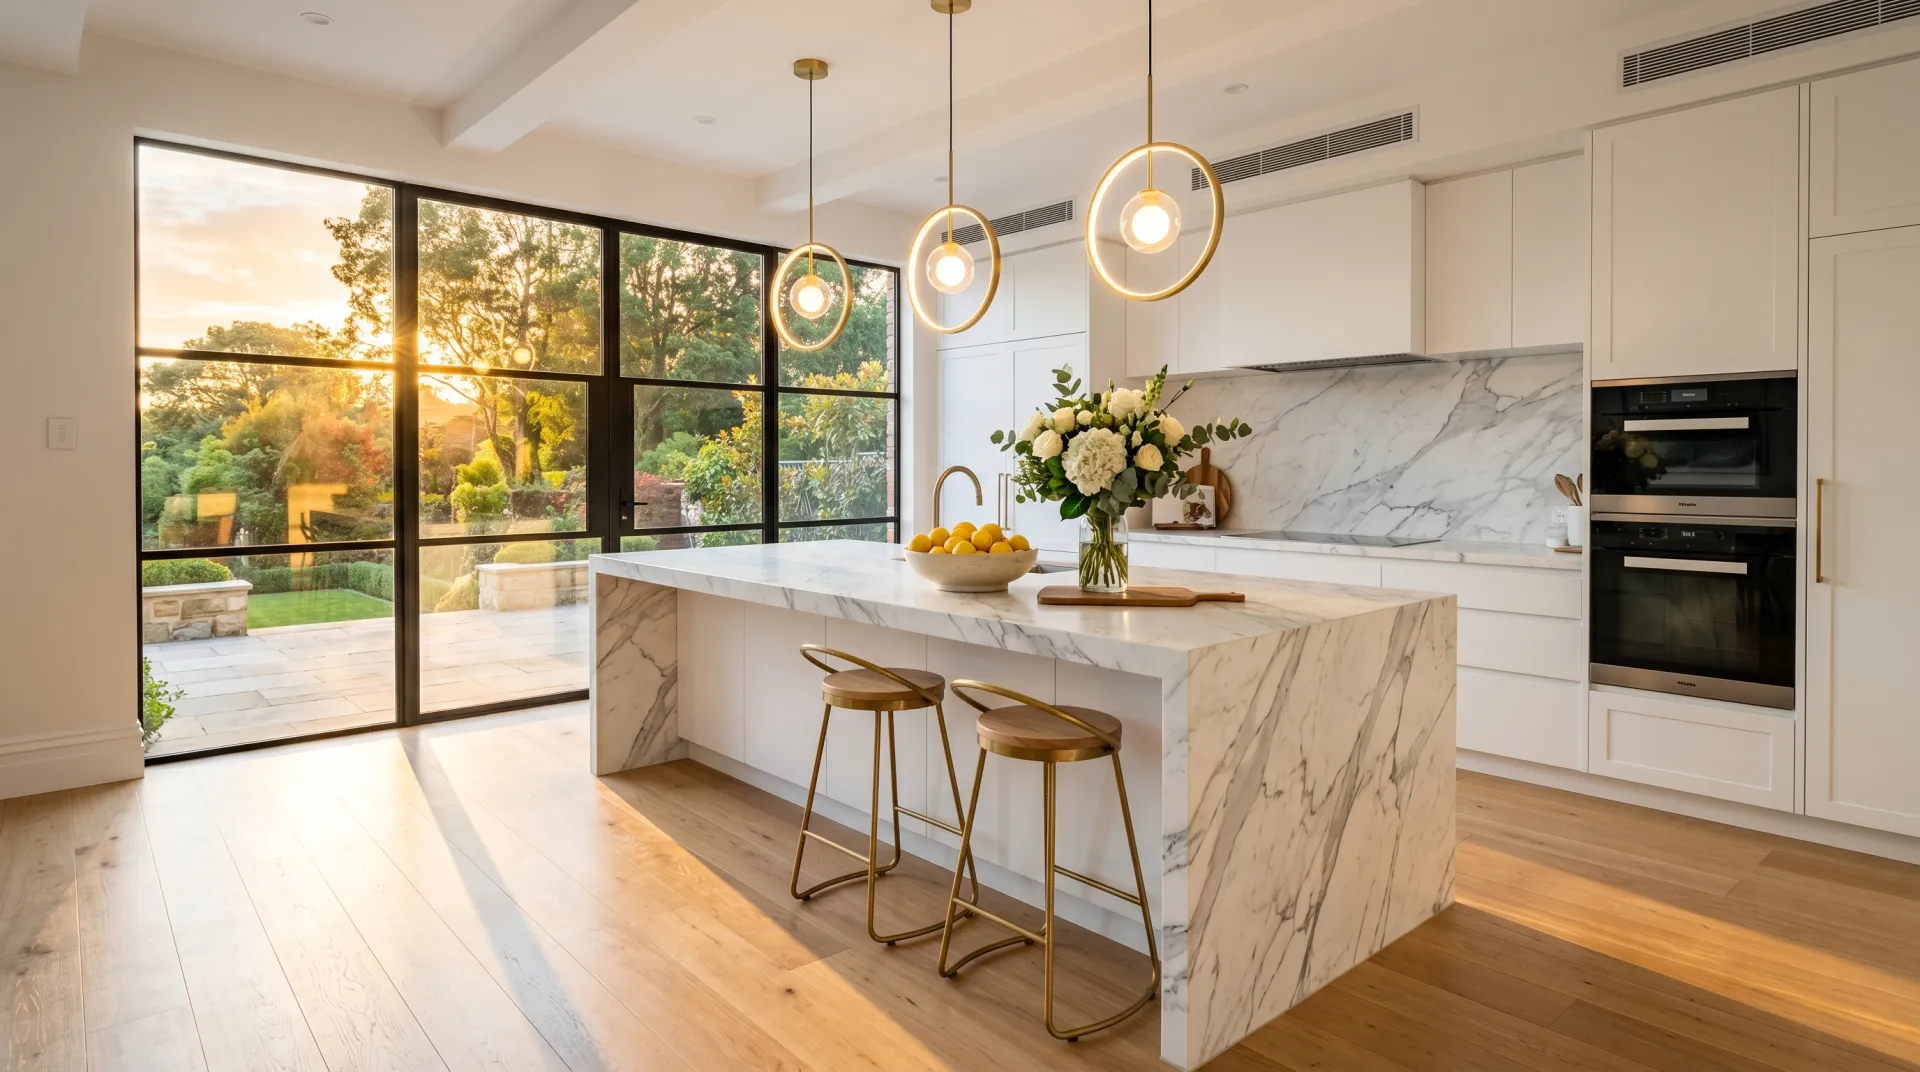
Kitchen and living areas: the emotional core of the listing
Kitchens and living rooms earn the most frames in any listing gallery because they drive the emotional decision to book a walkthrough. Plan 4, 5 shots per space, using diagonal corner angles at waist height to create depth and show scale. Where the kitchen, dining, and living areas connect, try to capture that connection in a single wide frame. Open-plan flow is a major selling point and buyers respond to seeing it clearly. Cover focal points specifically: island benches, fireplaces, views from windows, and any architectural details that justify the price.
Bedrooms and bathrooms: quality over quantity
The primary bedroom gets 3, 5 shots including access to the ensuite. Secondary bedrooms need 2, 3 each, more than that creates redundancy that dilutes the gallery rather than strengthening it. Bathrooms shoot best at slightly above vanity height, and 1, 2 shots each is sufficient unless the bathroom is a genuine feature. Leave garages, linen closets, and utility spaces out of the final gallery unless they represent a genuine selling point. Every frame should earn its place by making a buyer more interested, not just filling out the count.
Editing workflow that produces consistent, natural-looking results
The edit is where raw captures become polished listing images. A repeatable workflow in Lightroom and Photoshop saves hours across a full shoot and ensures consistency from the first frame to the last. The biggest mistake in post is chasing "wow" at the expense of natural. Buyers are quick to notice over-processing, and research into listing engagement suggests it can erode trust before they've seen a single room in person.
Global corrections in Lightroom first
Start in Lightroom Classic: cull the shoot using flags or star ratings to identify the best angle from each space, then apply a base preset across the full gallery for consistent color temperature and exposure baseline. Adjust white balance room by room based on the dominant light source, warm for rooms with incandescent or amber LED light, cooler and more neutral for spaces with strong north-facing daylight. Apply lens profile corrections to fix distortion and vignetting from the wide-angle lens, then batch-sync adjustments across similar shots taken in the same room under the same light. This step alone cuts editing time significantly on a standard shoot.
Exposure blending and perspective correction in Photoshop
For interiors with challenging window dynamics, blend bracketed exposures in Photoshop using layer masks, or run them through Lightroom's HDR merge for a faster result on less complex scenes. Use Photoshop's perspective correction tools to straighten vertical lines and eliminate keystoning, the converging wall effect that wide-angle lenses introduce when the camera isn't perfectly level. Final checks before export: sky replacement on flat grey exterior skies, object removal for any remaining distractions the prep stage missed, and a natural tone curve to avoid the heavy-handed HDR look. That hyper-saturated HDR aesthetic dates a listing immediately. The goal is images that look like the room on its best day, not a render.
When DIY hits its ceiling: the cinematic difference
These real estate photography tips will sharpen any agent's visual output, and for most standard residential properties, a well-prepared, well-lit, cleanly edited shoot is exactly what's needed to compete. But there's a category of property where "professional-looking" simply isn't enough: luxury homes, off-the-plan developer campaigns, and agency brand content where the visual assets carry significant value and need to perform across multiple platforms simultaneously.
The gap between sharp photos and editorial storytelling
Technically correct listing photos document a room. Genuinely cinematic property imagery creates mood, establishes narrative, and makes a buyer feel something before they ever book a walkthrough. Bridging that gap takes more than a good camera and clean editing. It requires creative direction, intentional staging, controlled lighting setups, and post-production that goes well beyond Lightroom presets. The result is content that doesn't just represent a property accurately, it makes the property aspirational.
What a full-service studio like 101 Studios delivers
At 101 Studios, the production approach starts with campaign strategy and creative direction, not just a booking confirmation. Every shoot is built around the sale objective: who the buyer is, what emotional response the property needs to generate, and which assets, photography, videography, drone aerials, 3D virtual tours, short-form social reels, will move that buyer from scroll to enquiry. Full color grading, audio production, and post-processing are handled in-house, so the final deliverables are cohesive and campaign-ready rather than a collection of disconnected files. For agents and developers who need content that justifies premium pricing and generates genuine interest, that end-to-end capability makes a meaningful difference to what the listing achieves.
Great listing photos start before the camera turns on
These real estate photography tips all point toward the same conclusion: exceptional listing photography isn't primarily about the camera. It's about preparation, light, and intention at every stage of the process. When agents approach a shoot with a properly staged home, a clear shot list, the right settings, and a consistent editing workflow, the quality shows, in online engagement, in enquiry volume, and in how quickly a listing moves.
Buyer expectations are rising. The gap between average and exceptional listing content is widening, and agents who invest in visual quality now are building a competitive advantage that compounds over time. Every listing is a marketing event, and the photography is the headline.
For agents and developers ready to move beyond DIY and into full cinematic production, 101 Studios exists for exactly that purpose. Reach out to discuss your next campaign and find out what story-driven property photography can do for your listings.
Get a quote matched to your listing
101 Studios makes every home exceptional. Cinematic photography, film, and drone that turns any Sydney listing into one buyers can't scroll past. Serving all of Sydney.
Book 101 Studios